Monthly Archives: May 2013

Above the Clouds

This morning we awoke to this. A massive fog bank gathered right up to the edge of Pismo Beach. It looked like we were above the clouds. And in a sense we were, at 325 feet (99 m) above sea level.

DSC_0008And as the sun rises, the fog quickly rolls back. Every time we look out the windows there’s something new to see.

DSC_0004

Bathroom Progress

The second bathroom is coming along well. When we bought the house we looked beyond the ugly floor, dingy walls and grimy bathtub tile to see a good sized space with a lot of potential.

DSC_0046The vanity tile looked like it had never been used and was a perfect vintage apple green. We had to keep it. The rest of the house was so filthy, I don’t understand how it aged so well.

DSC_0045crop

On the other hard, the toilet, bathtub and tile were unsalvageable and had to go…

DSC_0047Here’s the new terrazzo tile that Chuck found to coordinate with the vanity top. He did a great job cutting the tiles to fit and grouting.

IMG_1514The gleaming floor sets off a nice new toilet.

IMG_1532

And a brand new deep soaker tub miraculously fit in the old tub’s niche. The backer board on the walls is ready for new tile. The black plastic device on the wall is the underlayment for a soap and shampoo niche; it will be tiled over too.IMG_1531The final result will be a wonderful retreat after a hard day!

IMG_1529

Guest Bedroom Wallpaper

Chuck has been very busy with many projects lately. The house is really coming together. Remember the atmospheric blue Graham&Brown wallpaper he picked for the guest room?

Graham & Brown Lucid Wallpaper - Light BlueHere it is on the wall!

IMG_1510It coordinates perfectly with the other three painted walls, and it’s a beautiful contrast with the white trim and oak floor. What’s not obvious in the picture is the rich texture and hint of metallic shimmer. The recessed lights rake across the walls at night, highlighting the effect.

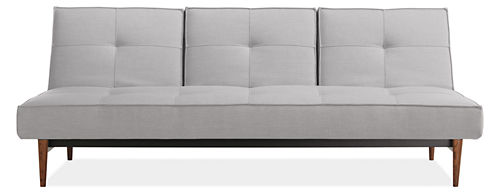
IMG_1512This will make a perfect guest room, especially with the comfy and chic new sleeper sofa that’s coming this week from Room&Board. The turned walnut legs add just the right mid-century touch.

594059


Bathroom Floor Tile

Our house has two bathrooms, but for the time being we’ve been using one, the ensuite in the master bedroom. It’s exciting to see progress on the second bath. We ripped out the stained, worn out linoleum and are replacing it with a terrazzo tile floor. Terrazzo is a mixture of stone chips bound in cement and polished to a brilliant gloss. It’s period appropriate for our 1955 house, and we actually managed to find a shade that coordinates with the existing vintage vanity countertop.

DSC_0020

Chuck has begun work by cutting the tiles to fit. We’re using the thinnest possible grout line with 1/16 inch (1.6mm) spacers.DSC_0008 It’s a detail-intensive job with many cuts required to fit around corners, heating vents and plumbing. Can’t wait to see the results!DSC_0009

Living Room Makeover Sequence

Editor’s Note: Chuck gave me an earful about posting “after” photos with un-fluffed pillows and household items lying around. When the room is completely done we’ll post magazine-quality styled photos, I can assure you.

Now that a thousand pounds (454 kg) of Norstone white quartz veneer is ready to go on the fireplace wall, this seems like a good time to review progress in the living room. Here’s how it looks right now.

DSC_0001

DSC_0002

DSC_0003

Pugs always improve the look of a space. Hugo, Lola, and Mikey love to hang out here. Because we live with pugs, we also pay attention to what’s on the floor. In our experience, expensive antique rugs don’t work out so well. So we use “FLOR” tiles. FLOR is an innovative carpet tile system, made of individual 50 cm (19.7 inch) squares that fit together over any flat surface. If one square is stained or damaged, we just replace the square, not the entire carpet. Almost every carpet in the house is FLOR, as they come in a huge variety of colors, patterns and textures.

And here’s the updated entry with our beautiful Crestview door and Jonathan Adler ceiling light.DSC_0004

This passage used to be blocked by a closet, and the kitchen beyond was a small, dark bedroom.DSC_0005b

Here’s a step-by-step progression. I took these first pictures in early December while the house was still in escrow. The nearly 60-year old oak floors needed some attention.

DSC_0030And that sad ficus shoved in a corner had to go!

DSC_0027

DSC_0028

Here’s how the entrance used to look: dark, closed off, and anything but welcoming. The kitchen used to be away from the action, in the far corner of the room to the right.DSC_0031

Here’s a mid-renovation shot, before we installed the beam to support the load of the new opening between the new kitchen and living room.

DSC_0040

And here’s a picture of the ceiling treatment before the lights went in. Chuck had the brilliant idea of using big-box store bamboo flooring on the ceiling. It adds warmth and conceals the wiring for the lights and fan. The room tended to look cold and dark at night, so wood and lighting really warmed it up.DSC_0017The stone veneer on the fireplace will be a stunning finishing touch. We can’t wait to get started on it.

DSC_0001

SLO Home Show

Thanks to all of our wonderful readers! Your comments and feedback are making this blog a lot of fun to write. Many of you have asked about Chuck and his products and services available through C W Quinn Home. If you want to find out more, he’ll be at the San Luis Obispo Home Show this Saturday and Sunday. It’s at the Alex Madonna Expo Center May 4 and 5, and it’s totally free! For information visit slohomeimprovement.com

Firewall

We’re very excited about the next project: remaking the fireplace in the living room. Here’s how it looks right now. As you can see, the cement board needs some sort of covering.

DSC_0006When we bought the house, we immediately saw the potential in the tiny, underused hearth between two dramatic ocean view picture windows. The original 1950’s brick was unsalvageable because someone had shoddily covered it with cheap tile.

189757_04Chuck’s design enlarges the visual impact of the fireplace by carrying it all the way to the ceiling. We chiseled off the tile, framed out the wall, then attached cement board.

IMG_0735

DSC_0048And here’s what’s next: a gorgeous natural stone veneer!

banner-rock-panel-white

This will make the fireplace into a feature wall. We looked at many different stone veneers before choosing Norstone. It’s natural quartz that looks like real stone because it is real stone. It runs about $22 per square foot, and we have 50 square feet (4.6m²) to cover. It’s not the cheapest product, but it will get a lot of attention as the centerpiece of the room. There are a lot of engineered and artificially pigmented veneers out there that just don’t look convincing. Norstone doesn’t have that problem. It’s an exclusive product that’s not available in big box stores, so we were happy to learn that we could get it from San Luis Obispo-based Air Vol Block.

It’s a tone-on-tone white that will coordinate perfectly with the pale gray countertops in the kitchen and airy color scheme in the rest of the house.  Here’s an example of how it looks installed. We can’t wait to see the final result!

Screen Shot 2013-05-01 at 8.24.41 PM